Oaks. Posted March 30, 2021 Share Posted March 30, 2021 Ayup lads, this could be a shambles or a great tutorial, let's discover it together. I get asked how to do basic graffiti quite a bit on Faction Discords, so figured why not show you guys. You need to have some sort of basic knowledge in PS for this to work, I'll guide you as much as I can. Example here: (These are obvs basic for the tutorial purposes) Requirements: x1 Photoshop(GIMP/Photopea can work too, but for this tutorial I'm using PS) x1 Screenshot x1 BrainSpraypaint Brusheshttps://www.brusheezy.com/free/spray (Be aware, some come with effects so you may have to play around for desired result) Reference material can also help, base it on LA Gangs for full effects. Surenos/Hoovers/Crips, etc are all a good point. Spoiler Alright, so first things first, you can use a multitude of brushes, spraypaint ones for the full effect. But for all tutorial purposes, I'll use the basics so you get an understanding. I'll be using the following brush: You don't need to do any fancy brush effects, just keep it simple. So, you'll want to create a layer, rename it to paint layer to avoid any confusion. (Lock the background later, trust me) On the paint layer, you'll want to draw out your basic idea over the top of the image. I'm using Sureno Art as an inspiration, remember keep it simple, if you want to make large memorials then that's another thing entirely, we'll purely keep it tag-banging and tags only. (Don't be afraid with imperfections, these can add to the tag authenticity) Now obviously, this doesn't fit at all, so you're going to have to edit the layer. CTRL + T is your friend here. (If you have a slanted wall like mine then you'll need to use CTRL when adjusting the tag as this activates perspective mode. A flat tag on a slanted wall will look stupid.) Now, we need to start using the environment, sun positions and opacity to mess around so this looks good. If you're looking for a quick one, "Overlay" "Linear Burn" & "Soft Light" all work really well for this effect. Now remember, paint fades in the baking LA sun, so you're going to want to drop the opacity down some more. There is no specific opacity that works better than others as it depends on the scene lighting, time and so on. For this tutorial I've dropped it down to 67%. It's getting there, but more tweaks are needed, this is where the environment will come into play. As you can see, we have white fences blocking spray locations and the bottom of the wall should be slanted a little bit more. There's two ways you can go about this, especially with fences, the fences themselves would be sprayed, but the colour would be degraded slightly more. So you can get this effect by dropping your Eraser Tool to about 30% and erasing small areas. If executed, you'll get an effect like this (Rushed but its there) OR You can outright just remove them from there as if the tagger themselves took a little bit of time on it like so, And wallah, you're done. Remember you can get real creative with it, you don't always need to use the environment, especially if it's a flat wall and such. Any questions, drop me a message on Discord or here I guess. 10 Link to comment
Shekh Posted March 30, 2021 Share Posted March 30, 2021 9 minutes ago, Oaks. said: Requirements: x1 Brain damn now I cant use the guide 😔 1 Link to comment
Oaks. Posted March 30, 2021 Author Share Posted March 30, 2021 4 minutes ago, Shekh said: damn now I cant use the guide 😔 that's okay you can borrow mine Link to comment
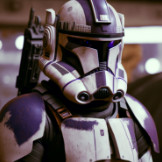
Rascal Doporto Posted March 31, 2021 Share Posted March 31, 2021 Good stuff and also as an addition don't be afraid to play around with your brush settings. A good one to use but also might take some time getting right is the Fade, can make a huge difference depending on what style you're going for. Without fade above and with fade below. 1 Link to comment
west Posted March 31, 2021 Share Posted March 31, 2021 4 hours ago, Rascal Doporto said: What brush are you using in that picture? Link to comment
Antoine_Boyd Posted March 31, 2021 Share Posted March 31, 2021 4 hours ago, Rascal Doporto said: Good stuff and also as an addition don't be afraid to play around with your brush settings. A good one to use but also might take some time getting right is the Fade, can make a huge difference depending on what style you're going for. Without fade above and with fade below. yeah i'm gonna need that brush too. Link to comment
Halcyon Posted March 31, 2021 Share Posted March 31, 2021 Solid guide, I like it. I’ve been doing some graffiti here and there in photoshop and I’m using a different technique but for beginners this is great. also voila* not wallah. *don’t kill me* 1 Link to comment
Oaks. Posted March 31, 2021 Author Share Posted March 31, 2021 2 hours ago, Glitch said: Solid guide, I like it. I’ve been doing some graffiti here and there in photoshop and I’m using a different technique but for beginners this is great. also voila* not wallah. *don’t kill me* I was drunk when I wrote this, so thanks for the correct spelling haha. 1 Link to comment
Cuete Posted July 26, 2021 Share Posted July 26, 2021 On 3/30/2021 at 6:24 PM, Rascal Doporto said: Good stuff and also as an addition don't be afraid to play around with your brush settings. A good one to use but also might take some time getting right is the Fade, can make a huge difference depending on what style you're going for. Without fade above and with fade below. Posted March 30 On 3/30/2021 at 6:24 PM, Rascal Doporto said: What brush are you using in this picture? Link to comment
Recommended Posts
Create an account or sign in to comment
You need to be a member in order to leave a comment
Create an account
Sign up for a new account in our community. It's easy!
Register a new accountSign in
Already have an account? Sign in here.
Sign In Now