Search the Community
Showing results for tags 'mods'.
Found 16 results
-
SHOP NOW!
-
((PREORDER NOW BUTTON))
-
 Yea, so the title pretty much explains it. I already used ArchiveFix prior and my game ended up crashing with the error shown in the title. Any help or ideas on how to fix? Thanks.
 -
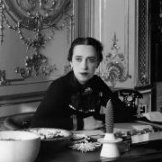
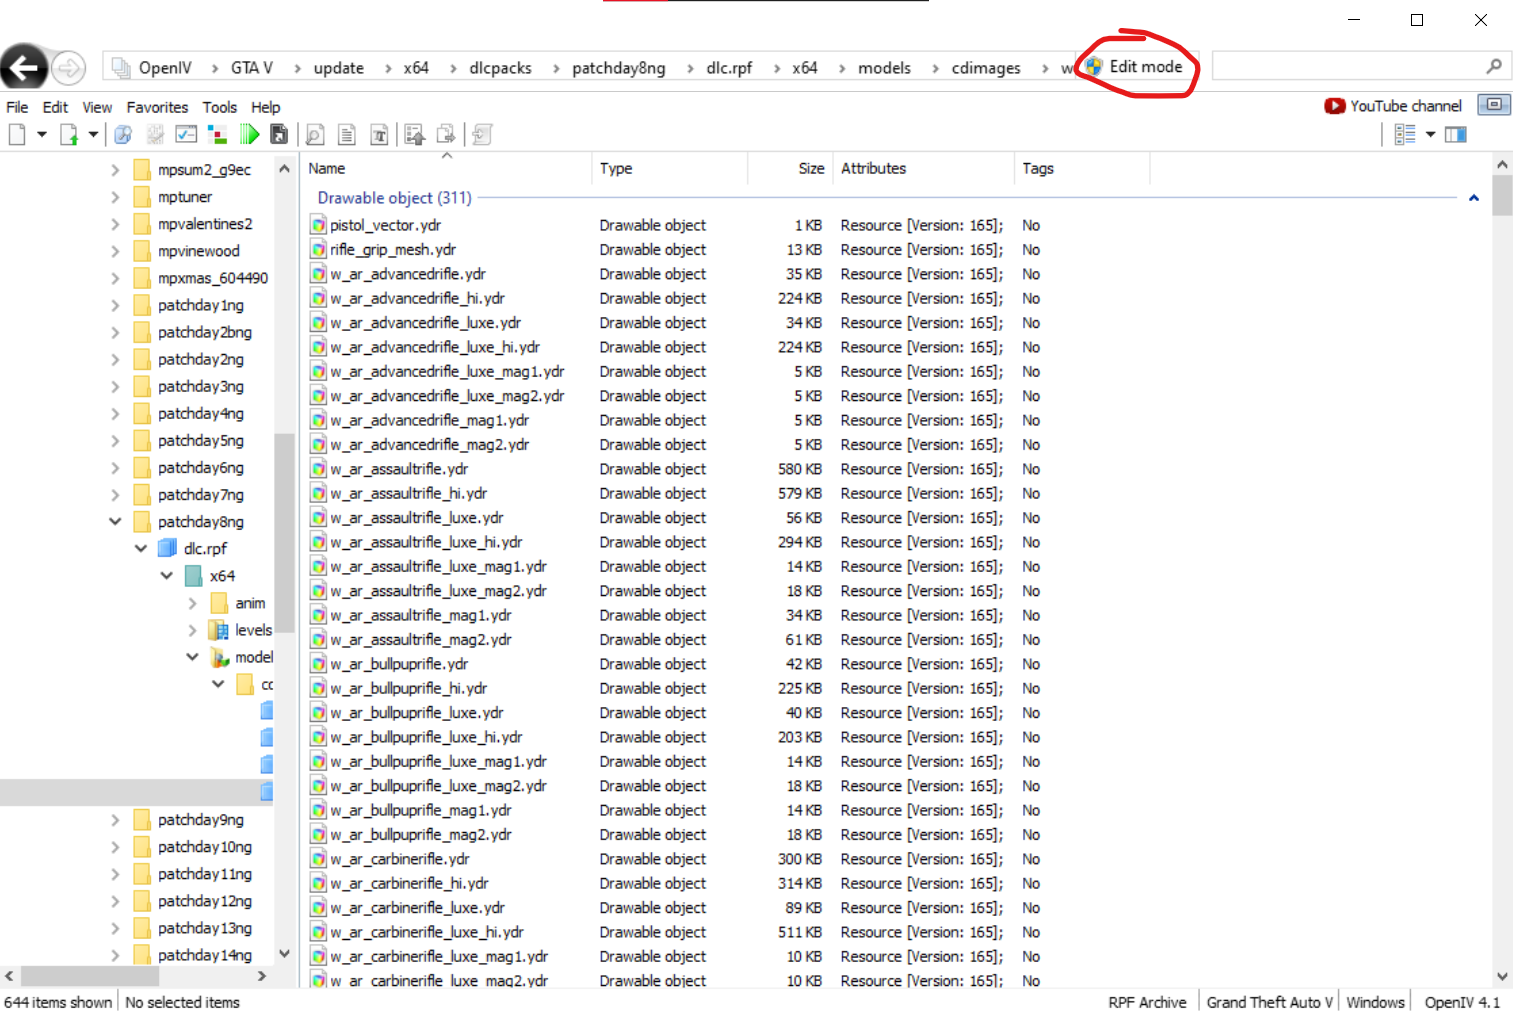
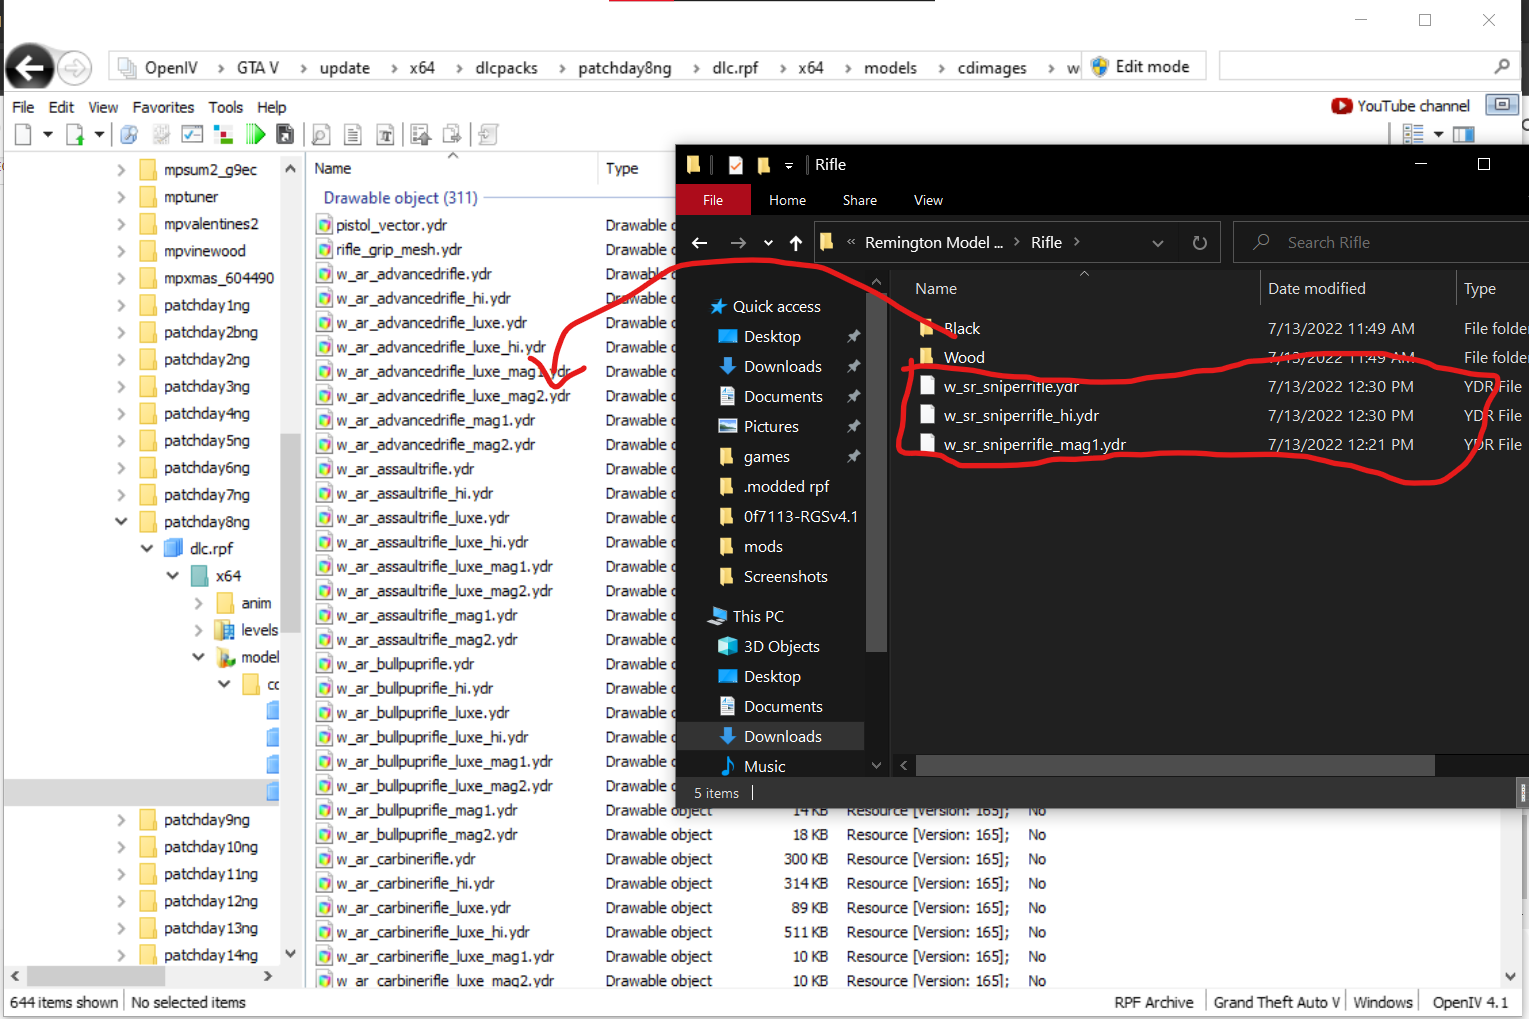
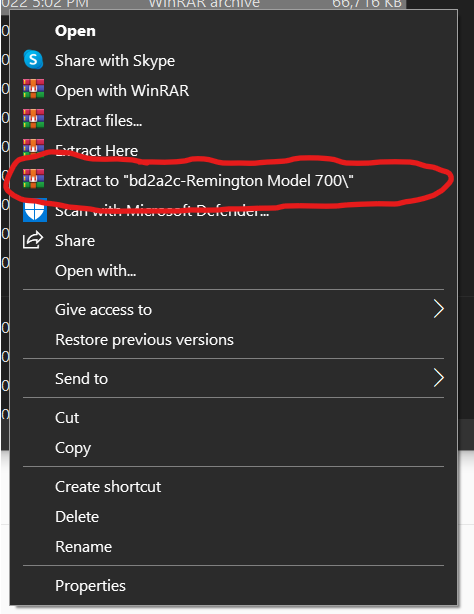
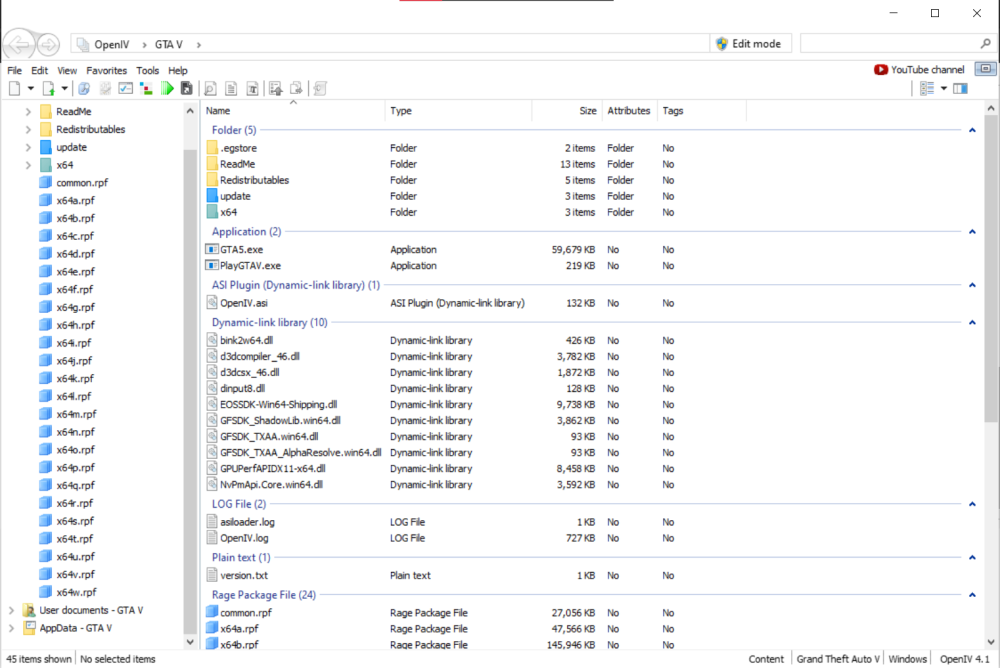
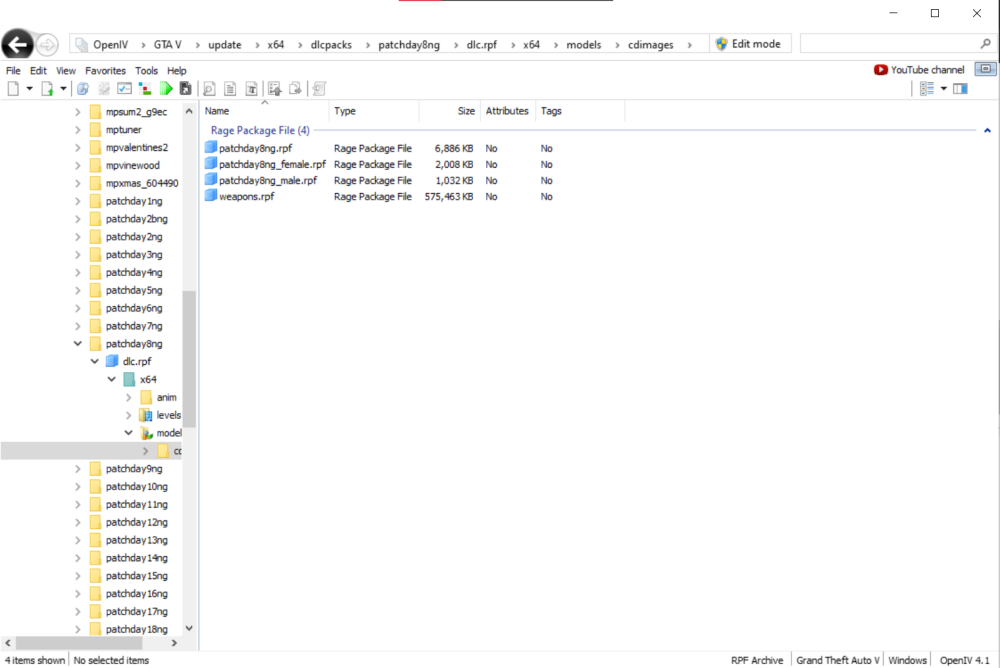
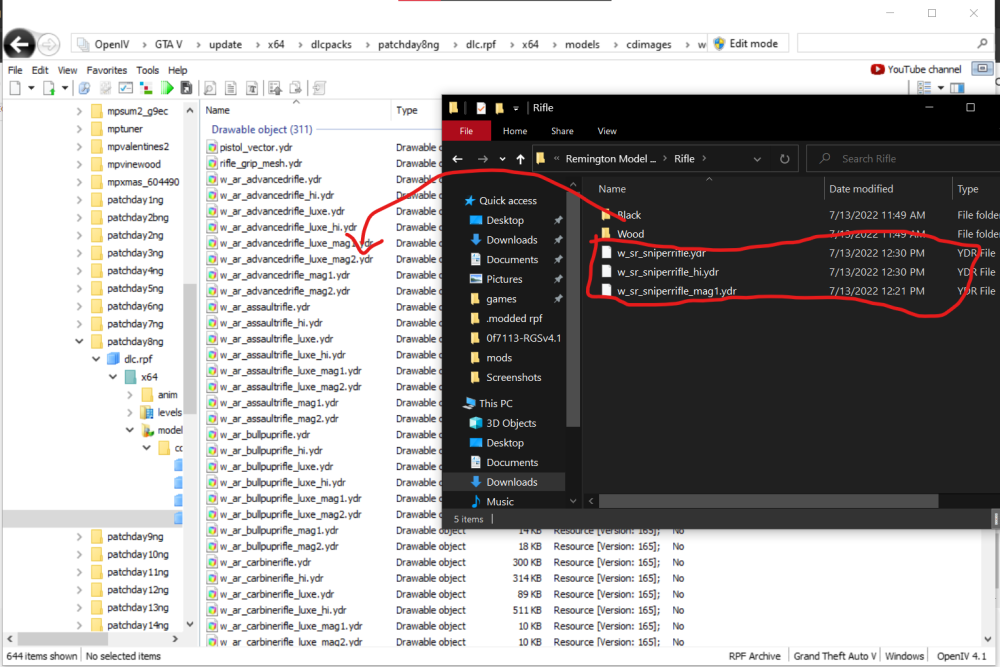
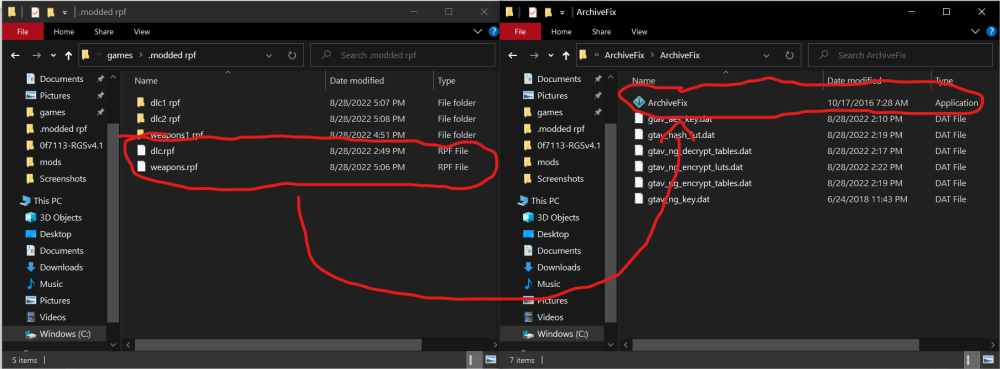
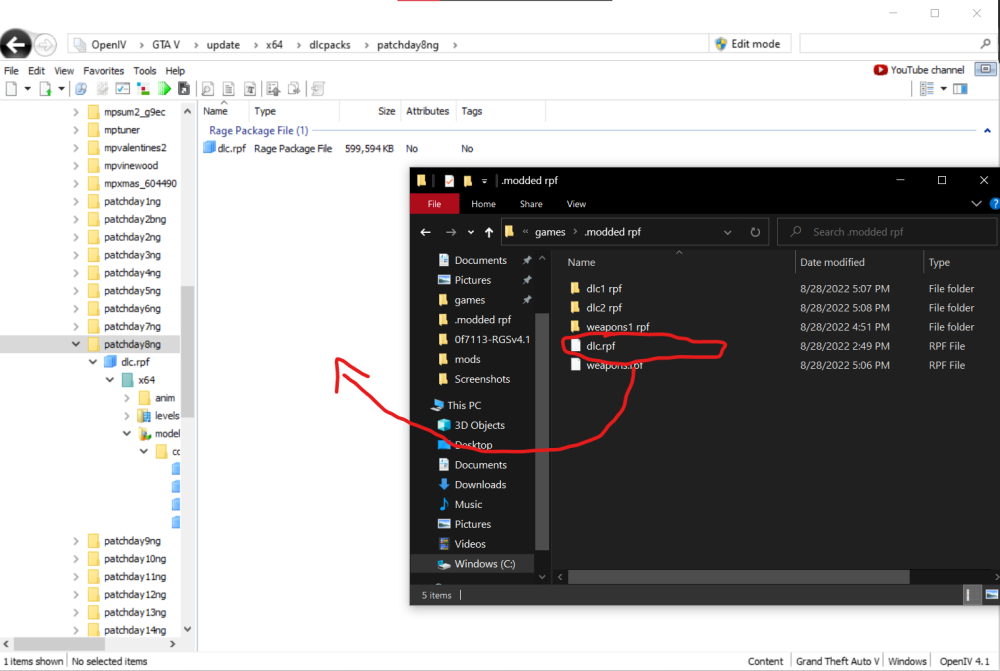
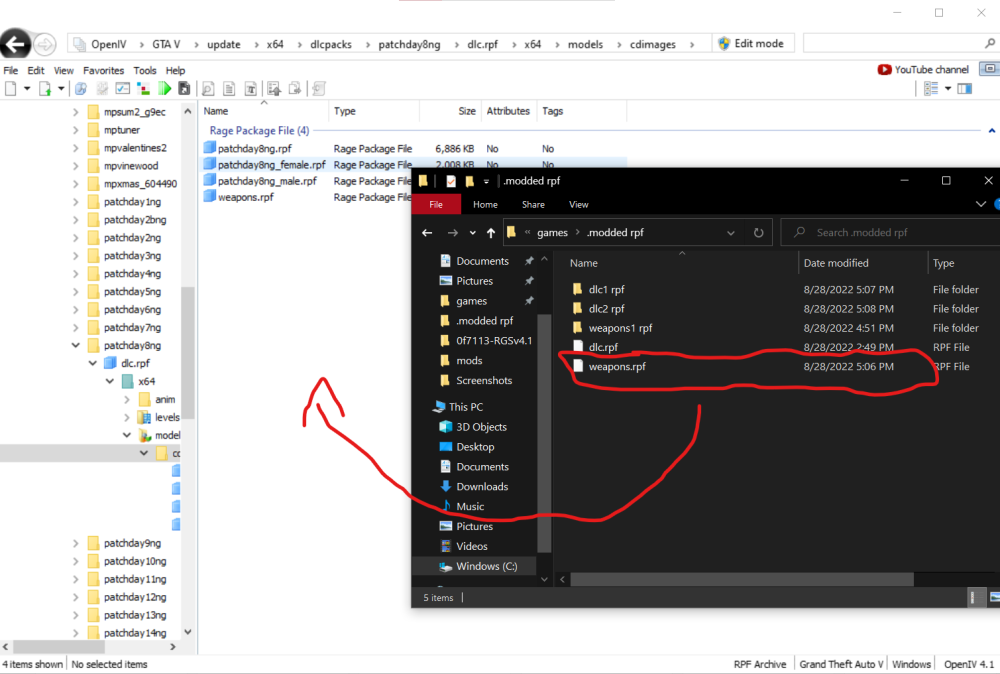
Are you sick and tired of default GTA weapons and want your immersion to increase? Well, I have a guide for you. I made this guide since I quite literally couldn't find a guide going over weapon replacements, after two days of struggling and a quick recommendation from @Ketamine Kowboy, they finally worked. Note; I am on the Epic Games version of GTA, and I don't have my Rockstar Launcher bypassed, so note that in case you think having either of those is an issue. To begin, you'll need a couple of things in order to properly install these without your game breaking. OpenIV (needed to edit the game files) ArchiveFix (needed to verify files to avoid corrupt game data crash) Any program for extracting ZIP files. (WinRAR, 7zip, etc. WinRAR is my personal favorite.) Once these two are installed, you're now ready to begin your journey. (I'm not going over how to install these because it's quite simple, OpenIV just needs your game directory and ArchiveFix just needs to be extracted.) NOTE; You must setup ArchiveFix in order for it to properly work. See Nervous' guide on how to that and OpenIV up. Let's begin. 1. Find yourself a weapon replacement mod, these are found on pretty much every GTAV modding website out there. Download it. Ah there it is, in all it's glory. On to the next item of business... 2. Extract the file using whatever program you have. You should now have a folder that contains the stuff you need, like this, Now, we have our weapon replacement ready for installation. 3. Start OpenIV, and go to GTAV Windows. Pretty simple, now let's actually begin the installation. 4. Go to this path, and locate the "weapons.rpf" folder. GTA V -> update -> x64 -> dlcpacks -> patchday8ng -> dlc.rpf -> models -> cdimages Now for this tutorial, I am using patchday8 weapons as an example. This will be one of the most common due to the fact that most weapons people want replaced are here. Now we start with the harder parts. By the way, have a backup of the dlc.rpf file in case you mess anything up. You can do this by right clicking on it and clicking "Extract." 5. Once you're in the weapons.rpf file, open up your weapon replacement and click "Edit" near the top right-corner of OpenIV. This is where you'll be dragging all of your replacement files to. A backup for this isn't necessary due to the fact that even if you put the base backup in, your dlc.rpf folder was still modified. Hence why you need to make a backup for dlc.rpf. 6. Drag all of the "ydr" and "ytd" files found within the weapon replacement onto OpenIV, it'll automatically replace the files. You can double click on the "ydr" files to ensure that your model was successfully replaced. NOTE; Some weapon mods, such as the one I used for this tutorial, have different texturing options. For example, mine has both a wood and black texture. Most mods really won't have this, they'll usually have all the files and a ReadMe in the folder itself. DON'T drag the ReadMe or a folder containing textures in, only drag in the "ydr" and "ytd" files. Your weapon(s) are now ready for the next step. (MAKE SURE YOU HAVE ARCHIVEFIX SETUP PRIOR TO DOING THIS, OR IT WON'T WORK.) 7. Extract your weapons.rpf and dlc.rpf into a SEPERATE folder from the original dlc.rpf backup you created. (Simple step, doesn't really need a photo.) 8. Drag your extracted archives (weapons.rpf and dlc.rpf) ONTO the ArchiveFix executable. One at a time. I would show a picture of what it looks like when you do that, but ArchiveFix closes when you press any button. It'll say something about communism and that it did it successfully if done right. 9. Drag those two fixed files and drag them into their correct directories on OpenIV. MAKE SURE EDIT MODE IS ON! 10. Open up RageMP and pray to god that you did everything right! Now some weapons are actually located in other DLC files, it's pretty much just the exact same steps done here. I'll be putting out my own Weapon Pack soon, and possibly a tutorial for weapon sound overhauls. Stay tuned! Also, please leave a suggestion for any additions that should be made to this guide. Immersion!


- 1 reply
-
- 1
-

-
- weapon mods
- mods
- (and 2 more)
-
Literally just a collective topic where I can show off my in-game screenshots that I've taken with NVR, PRSA (Heavily modified and I've removed half of the files, oops?) and my own Reshade configuration. NOTE: The screenshots at the top, are the oldest, and the screenshots at the bottom, are the newest. Throughout all of these screenshots, chances are, I've tweaked my settings and configuration of my ENB and/or Reshade to get a nicer image out of it, hence why my later screenshots look better ? All of these screenshots have been taken in GTA World whilst playing, some with and some without the help of /camera. ADDED: 05/APR/2020 ADDED: 08/NOV/2020 I've changed my mod setup entirely. I'm now using Realism Beyond as the base of the entire mod, a slightly tweaked ENB and ReShade setup.

- 16 replies
-
- 13
-
-

-

-
- photorealism
- nvr
- (and 2 more)
-
Short description: Simply, real life cars Detailed description: Real cars from reality to add into GTA:W, such as Toyota, Honda, Jeep, Dodge etc.. Commands to add: Just the regular /vg Items to add: We can add the vehicles ourselves as it's quite easy, there are tutorials online by Criminal Justice (my personal go-to) or others. How would your suggestion improve the server? My suggestion would give more excitement to try out RP with real cars from our daily life, And people could catch the eyes of other civilians of Los Santos with a car like no other. And instead of having "GTA car meets" we can have real life car meets, but in GTA:W Additional information: This is quite basic to add, this obviously doesn't need to be added all-in-one. But it's something that people like me could look forward to and enjoy. People who have played or play LSPDFR with dlcpacks have definitely done things like this, so we can help with installing these items into the game itself or watch tutorials as I previously mentioned above. NOTE: THE FOLLOWING IMAGE ABOVE HAS NOT BEEN TAKEN INSIDE THE RP SERVER OR GTA:W
-
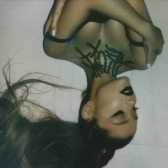
High-quality character images [Menyoo] A guide by @honey. / @jessica SUPPORT DISCORD: https://discord.gg/Menyoo 2800+ members! Hiya! Welcome to my first guide based on how to get high-quality character images! This can be a long process at the start however once you get a hang of it, it should be perfectly easy and quick to do! If you don't know what "images" I'm talking about.. here are some examples! . Step 1: Getting the right programs! (They're hyperlinked! Click on 'em!) The first step to all this, of course, is getting the programs you need! These are all very simple to get and you need to create a folder in your downloads and download all the following additions! (They are all safe, personally tested!) Menyoo - This is the main thing we will be using to make them look extra spicy, it's a single-player trainer mod. If you don't know what that is, it basically makes you admin of single-player and gives you access to everything on the game that you could possibly want. (Animations!) Scripthook - Menyoo can't work alone, they need Scripthook's help! OpenIV - This is what we are going to use later on to add stuff that we want which isn't in-game, you need this to make sure everything you're doing is safe and away from your main game! (I'll explain how!) Once you have all of those in a download folder, proceed to the next step! Close GTA if you have it open... you don't want that open at this point. Step 2: Preparing your Scripthook and Menyoo Now that you have the programs, it's time to get them set up. Locate your GTA5 Your GTA5 is, if using Steam, within your Steam folder. If you don't use Steam then I'm sure you'll know how to find it and if you do use Steam and saved it in a funky place, you must know what you're doing. For me, my GTA5 is in the following path. (Follow it) C:\Program Files (x86)\Steam\steamapps\common\Grand Theft Auto V Open the Scripthook Zip When you open the zip you are going to see the following 3 things: Open the "bin" folder Move everything inside of the bin folder to your GTA5 main folder. Open the Menyoo Zip When you open the zip you are going to see the following 4 things: Move only the "menyooStuff" and "Menyoo.asi" in to your GTA5 main folder. (If you are unable to do this, you need to right click the rar folder in your downloads, go to properties and unsure that it has a tick by unblocked! Credit to @Law) Perfect! Now you have what we're going to use to customize your screenshots (Menyoo) and what we need to run it, (Scripthook). Step 3: Preparing OpenIV This one is a bit more tricky and isn't easy on the eyes so make sure you're following each step appropriately. Open "ovisetup.exe" What you're opening right now is what we will use later to ensure our GTA5 is safe for any mods that are put in, this is your safety net. Follow the instructions As OpenIV installs, it will be giving you confirmations and what not, it's all good. If it says "Do you want to make a mods folder?" at any point, say YES! It may not happen until later but keep it in mind until then! Run OpenIV Now you have OpenIV, it is going to look very daunting but don't worry, you won't need to mess with it for long if you don't want to. Step 4: OpenIV Now that we have OpenIV, this is our first step in taking amazing screenshots, we are going to go through the ASI Manager and enhance our experience. Go to the "Tools" tab Go to the "ASI Manager" option Install all of the available options Step 5: Testing! We've added everything we need to to begin testing! Now here is what you need to do: Open GTA5 Go in to "Story Mode" (It will load really slow if you're not tabbed in to the game) Click "F8" twice This should bring up the Menyoo menu top left of your screen! Step 6: Getting your character Making your character in Menyoo is going to be a task and you really need to stick with it. Getting your character's attribute values You need these so the character you take photographs of actually looks like your character in-game. Here is how to get them: Go to your UCP Go to "Characters" Select the character you want to use Just under the name on the left side should be a drop-down "Face Attributes" Take a screenshot or leave the tab open. Getting your base character You now need to make that same base character within your single-player world. Open the Menyoo menu (F8) Go to Player Options → Model Changer → Multiplayer Models Go through the options and select "Freemode Female" or "Freemode Male" Be surprised by how funky your random model looks like. Go to Player Options → Wardrobe → Default Components Now go to Player Options → Wardrobe → Outfits → Save Outfit To File → Name it whatever you want! Applying your face attributes It's finally time to start sculpting your character! Go to Player Options → Wardrobe → Head Features Adjust all appropriate sections to fit your character Or you can reference this guide for an EASY QUICK convertor: The attributes are different You will notice that the attribute names are slightly different however they do change the same thing. On GTA:W there are some options that are not yet accessible so always make sure you are converting a character from GTA:W over to Menyoo because it will not work the other way around, they'll look too different. This stage will take some time to perfect but once again, it's all worth it. Saving the outfit Remember to keep saving your outfit, do not use "Apply outfit" when saying but instead "Overwrite file" on your selected outfit. Remember that if your character is in an animation when you save the outfit, it will bug and not work so make sure you're not in one. Step 7: Getting your pictures! Now that you have your lovely character in game, it's time to start fiddling around with other settings to get the perfect picture! Options Weather Options - Change what kind of atmosphere your picture will have as well as the weather. Time Options - You have free reign over the time of where this picture will take place, if you want it to not move, you can pause the time! Object Spooner - If you want to have a more custom backdrop, use items and you can even make other people too! Animations (Cannot be used with Snapmatic) These are going to play a huge part in what your screenshots will look like, so how do you use them? Player Options → Animations (→ All Animations → Search) Capturing the moment Now it's time to either Snapmatic it or Rockstar Editor! Snapmatic Snapmatic is basically just the camera app on your characters phone. You can access the phone but clicking the UP arrow key and then guiding it to the Snapmatic app. All of the pointers and directions are given to you on that app! It's basically like your character taking a selfie, a very simple and easy feature. A word of advice: Do not left click to take pictures, they come out looking horrible! Instead, hide the grid with G and just taking a regular Steam screenshot or a screenshot with whatever program you use! Rockstar Editor To use Rockstar Editor, once you have yourself set up in the position you want to capture, you need to click "F1". This is Rockstar recording by default so unless you've changed it, it will work. Leave it to record for about 10 seconds and DO NOT tab out! Once you feel that you have sufficient footage, you can click "F1" again and it will stop recording. It's now time to edit it! Step 8: Rockstar Editor (Skip to step 9 if you used Snapmatic) Now we have our recording, we need to fiddle with it and adjust it to capture the exact picture you're after. Open the map and go all the way right in the black tabs and select "Rockstar Editor" Create a New Project Add New Clip - say yes to everything after this. Camera When you have the option to enter the "Cameras" tab, you are more often than not going to select the "Free Camera" option. This, combined without OpenIV plugin allows us to do so much with the camera! You can zoom in and out as well as tilt it! "Remember that you can enable the free camera in Menyoo and toggle it using F3 - it's another way to go when it comes to taking screenshots." (Credit to @hentai!) Depth of Field If you're not sure of what this is, this basically is what you want the camera to focus on in your image. Normally I set this to my own custom one however the default one works really well! Effects These are just your filters and general effects, saturation, contrast, brightness and vignette. It is entirely up to you if you want to use this however normally I add what I want afterwards. From this point in Rockstar Editor, it's all about exploring! There are no limits for what you want to do, within reason, and this is entirely up to you! Make your pictures unique, funky places, whatever you want! Click "H" to hide the overlay and click "F12" to take your screenshots! Step 9: Editing your pictures Everyone is going to have a different way that they want to edit their photos when it comes to how they look. It's also important to keep an eye on clothing clipping as well as just general maintenance for your character. Colour correction Makeup enhancement Skin correction Shape correction Shadow correction Clipping correction Expression adjustments Adding in logos or other third-party items I use Photoshop to edit my images as well as the ones I do for others if you ever have any questions regarding this feel free to reach out to me and I'll either sort it for you or teach you how to do it yourself! Step 9.1: Photoshop This is actually another guide made by @xanx but it is completely worth the read! The guide got removed 😞 Thank you for tuning in! I hope that this at least helped you and if not, let me know what would make it easier to understand or follow! I haven't gone into detail about how to add mods or how to edit the photos but if that is something that you'd like, just let me know. If you have any questions about this, feel free to drop a comment and or tag me and I'll answer it as soon as I can! Please avoid Forums PMs as answering questions on this thread may help someone in the future!
- 214 replies
-
- 51
-
-
-
-
What Graphics mods do you guys use for this server? I've tried NVR, and Mehikos modpack and the game closes without an error every time it is loading in.
-
I've created a custom model for a clothing item in game as it's been UVW mapped by what I assume was a rockstar intern on their last day. I re-mapped the item with the texture in ODD format using 3DS, when I use OpenIV's model viewer my correct version shows. When I log in game I still see the exact the clothing item mapped incorrectly. It's not a modded item on the server so I can't wrap my head around why it shows different in game than in the editor. Can anyone enlighten me so I can get this mod sorted out?
-
Yes it is true. Some mods actually work on RAGEMP, and can work on GTA World. All of the mods are client sided mods, so other players won't see them, especially, because most of them are re-textures of the game, allowing some graphic enhancement. Before explaining, I would like to thank @Firesky for putting so much effort on trying to figure out on how these mods work and for re-encrypting all of them. How to install the mods: We are still working on most of the mods, but so far, from the ones we tested... if it is a DLC, you must re-encrypt the rpf file and drag it on the client resources folder, where you have the server mods. Pretty much like this. As you can see, "soupiesthairs" is synced for all the players, since you download it as soon as you join the server. Although, the LA Road mods, is a mod that is client side, since we added it to our client folder, and not all players have it. As for other mods such as the NVR, you will find a readme file that explains how to do it. You pretty much do a backup of your folders on the GTAV folder, and re-place all of those with the files. These files are re-encrypted with "ArchiveFix", they will work on RAGEMP without having the broken game error. https://www.mediafire.com/folder/940094nc4o4f6/Mods for Rage-MP by Firesky The link above are the mods that @Firesky and I have tested and work properly. If you find out some more mods and want to share, feel free to drop a comment here. Thank you for reading, and enjoy! New link: http://www.mediafire.com/folder/940094nc4o4f6/
- 249 replies
-
- 14
-
-
-
-
I've been trying to install a map mod on my GTA V Rockstar client, but every time I launch the game, the launcher updates and deletes the files. Some people said that blocking the internet connection in the firewall for GTA Launcher would work, but I can't seem to make it work or maybe I don't know how to. If anybody managed to fix this problem, please help me out here.
-
Short description: It's basically a suggestion for hair, clothes and quality of life mods. Detailed description: It's a long list of mods that I've gathered over the past and have saved in a txt file. Some are better than others. This suggestion isn't for all mods to be added. But it is a suggestion to add some of them, and it's up to feedback and the staff to decide which ones get added and which don't. I just know personally I like them all. I've catagorized them completely, too. Commands to add: None. Items to add: None. How would your suggestion improve the server? It'll allow players to express their characters better. Additional information: CLOTHES https://www.gta5-mods.com/player/custom-overalls-for-mp-female https://www.gta5-mods.com/player/hoodie-denim-jacket-for-mp-female https://www.gta5-mods.com/player/modified-hoodie-for-mp-male https://www.gta5-mods.com/player/hoodie-jacket-for-freemode-mp-male https://www.gta5-mods.com/player/high-heel-sneakers-textures-for-mp-female https://www.gta5-mods.com/player/female-mp-new-top https://www.gta5-mods.com/player/sagged-khaki-pants https://www.gta5-mods.com/player/momiji-thongs-for-mpfemale https://www.gta5-mods.com/player/iaa-badge-to-fib-badge-mp-freemode-male https://www.gta5-mods.com/player/female-mp-mini-dress https://www.gta5-mods.com/player/open-side-shirt-for-mp-female https://www.gta5-mods.com/player/ripped-shirt-for-mp-female https://www.gta5-mods.com/player/new-boots-for-mp-female https://www.gta5-mods.com/player/skirt-tights-and-socks-for-mp-female https://www.gta5-mods.com/player/skinny-ripped-denim-jeans https://www.gta5-mods.com/player/mai-cardigan-for-mp-female https://www.gta5-mods.com/player/cardigan-texture-pack-for-mp-female https://www.gta5-mods.com/player/female-mp-new-top https://www.gta5-mods.com/player/amanda-and-tracey-disanta-mini-pack-for-female-mp https://nl.gta5-mods.com/player/pikeys-los-santos-canvas-shoes-for-mp-female https://nl.gta5-mods.com/player/bon-bon-choker-for-mp-female https://www.gta5-mods.com/player/skinny-ripped-denim-jeans https://www.gta5-mods.com/player/top-with-belt-for-mp-female https://www.gta5-mods.com/player/dedsec-leggings-for-female-mp-character HAIR https://www.gta5-mods.com/player/another-braided-haircut-for-mp-female https://www.gta5-mods.com/player/long-haircut-for-mp-female https://www.gta5-mods.com/player/long-braided-haircut-for-mp-female https://www.gta5-mods.com/player/bob-haircut-for-mp-female https://www.gta5-mods.com/player/c-sexton-bush-for-mp-male https://www.gta5-mods.com/player/beards-for-male-mp
-
I followed the mod guide by Killerbite, I just wanted to add the map they have, and I did all the steps right.. -Downloaded the LA Roads map mod on the mod guide -Put the mod package in the server IP/DLC when I loaded the game it still has the normal in game map.. any ideas on what to do? Or if the modding even works? I downloaded it from the guide that states that it works but there could’ve been an update since then..?
-
With RageMP supporting dlcpacks(which are basically packaged mods which the server uses for their mods and players download) I figured why not make a thread for suggestions since we're moving to that client. What kind of mods would you like to see? What kind of additions do you think the server could use and be beneficial to an RP setting? I wanted to make one complete thread with everyone's suggestions or ideas. Post your suggestions below!
-
-
So basically right now we got an option to mod bikes wheels but it puts on the wheels from cars and only on the front wheel I know for certain that there are bike wheels for bikes especially made. So simply replace car wheels for bikes to bike wheels. Maybe while you at it add all possible wheels for the cars aswell. Here is a list of all possible wheels in GTA V: Motorcycle: Car wheels: \ Benny's rims: