Static
-
Posts
56 -
Joined
-
Last visited
-
Days Won
2
Everything posted by Static
-
Congrats
-
Anthony Graziano (if anyone still remembers me lol) hey'ya all 😅
-
It's been tweaked. Wait for the next update before reporting new issues regarding nametags.

-
It's impossible to test every single edge case with a feature such as this one, you can't expect us to go around testing it with every single entity in the game. We were aware that it would block nametags if your line of sight was obstructed by another player even before releasing but being a resource-intensive task already as it is (not for the server but your game clients), we didn’t want to push it further before getting some feedback first. For the videos in the OP, you probably didn't get ran over because of missing nametags. In both cases I don't see anything blocking their line of sight to you so unless you have a video from their POV these videos don't add any value the way I see it. I’m already working on a way to efficiently handle players behind other players, I’ll keep you posted.
-

Add a command to toggle names above everyone's head
Static replied to 1pablop's topic in Implemented Suggestions
Implemented nametags.mp4 -
When you have the choice to use either why take away others’ ability to use what they like?
-
Feature Showcase: Elections Introduction To help assist with the upcoming elections, a technical voting system has been put in place. The aim of this is to bring a much more immersive experience to both political roleplay and government roleplay, for more information on what the government does, their forums can be found here. How It Works For players, the voting system is relatively easy. With the elections electing council representatives, as well as a mayor, a 'district' map has been put into place. Characters will register to vote at one of their addresses and automatically be sorted into a district based on their address. On election day, players will head off towards a custom-mapped polling station within their district and be shown, by using the /vote command, the list of candidates running in that particular district, as well as the party they're running under. Players are then able to cast their vote with /vote [ID]. Following the district ballot, players will be able to vote for their mayoral candidate. The system will automatically tally all the votes for a particular candidate, and be able to give the winners of each particular seat to Legal Faction Management, who will be able to prepare inaugurations for the lucky winners!
-
GTAW : New infrastructure & better sync/ping
Static replied to Nervous's topic in Announcement Archive
Beast! -
Feature Showcase: Custom Shops Introduction Custom shops are a new business type that work as an extension to the business system that allows players to create shops whose merchandise is set by the players. This system introduces a new command into the fold /shop (/pawnshop or /itemshop also work as alternatives) which enables business supervisors and owners to manage the shop’s stock. A customer, by pressing Y within range of the shop is greeted with an interactive shop menu where they can purchase any of the listed items. The system is compatible with the order / employee system, allowing you to go through sells only when an employee is online so that orders can be processed. Management There's only one new command that is used to handle all shop management related actions: /shop (/pawnshop and /itemshop also work as aliases) /shop: The root of the command additem: Designates that you wish to add an item into the shop. InvItemID: Reference to the inventory slot ID. Leaving it blank will display your inventory. Price: The designated price of each item instance. Amount: The amount of instances you wish to add to the shop of the selected item. Removelisting: Designates that you wish to remove a listing from the shop ListingID: The listing ID which you wish to remove. (ID obtained by /shop list) List: Displays all the shop's listing along with their IDs to be used within /shop removelisting. Help: Displays a message with similar information regarding how the command works. Customer Being a customer is significantly easier, all you have to do is walk into a shop and press Y. You will then be greeted with an interactive menu and buy the items you wish to buy. Thanks to @St3fan[NL] for designing the User Interface seen above.

- 1 reply
-
- 1
-

-
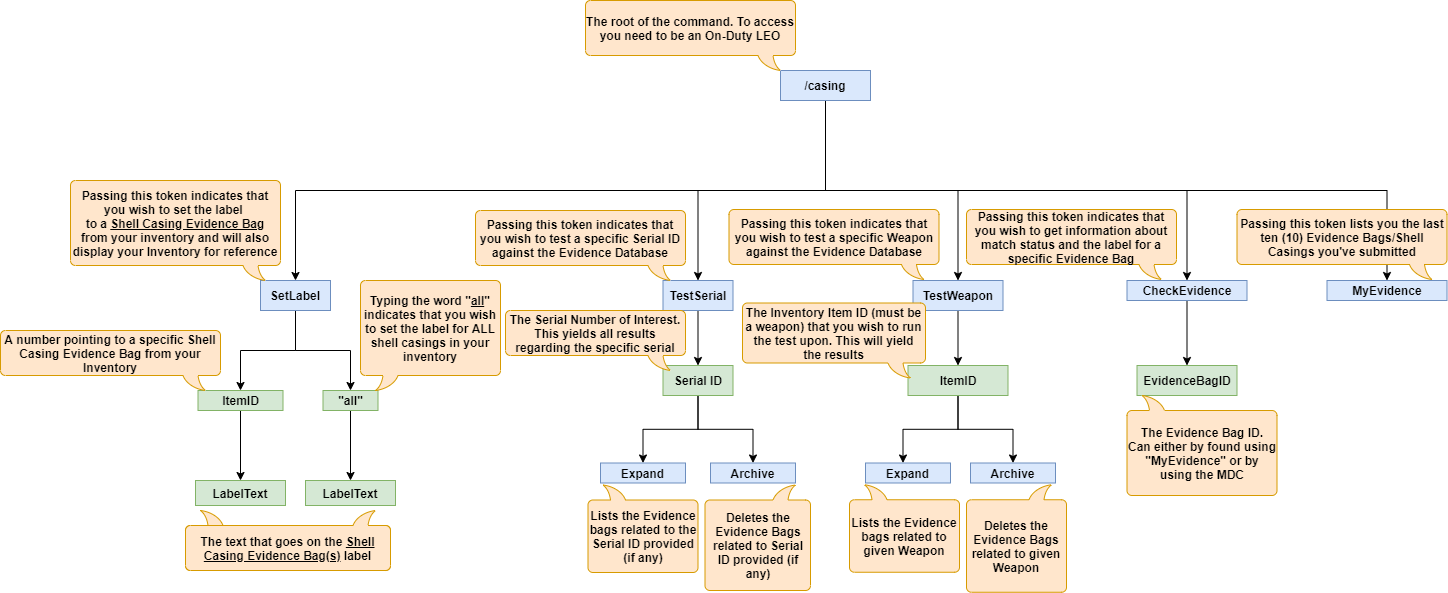
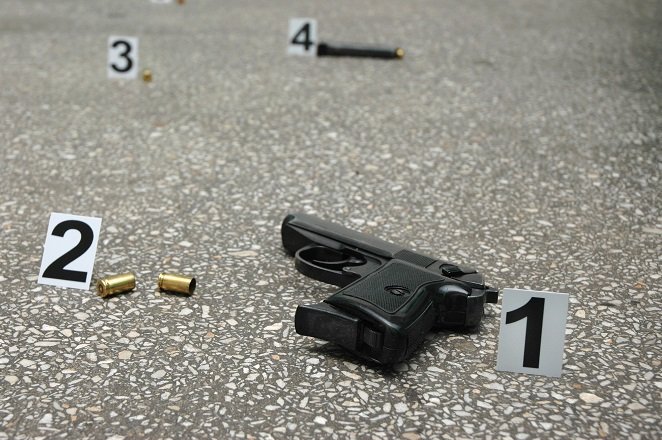
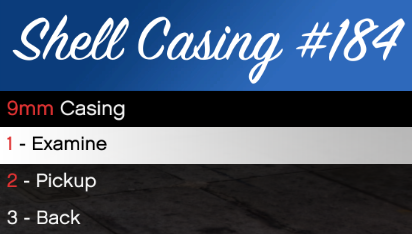
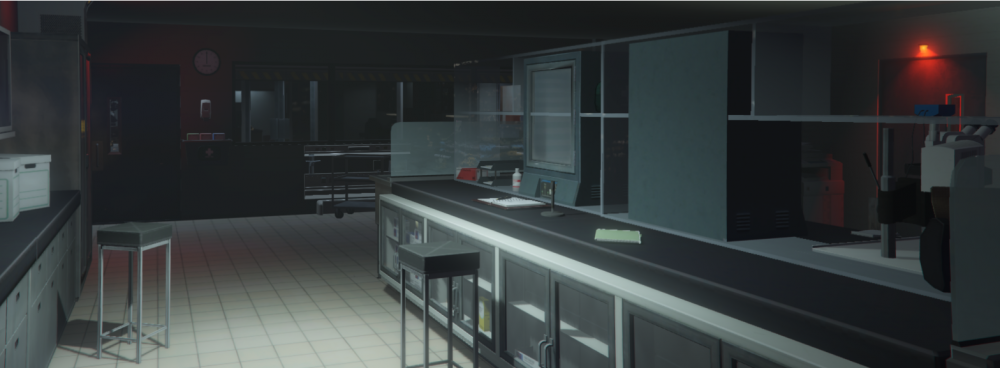
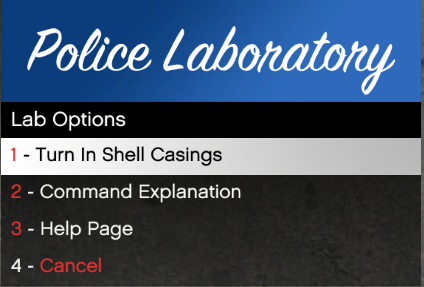
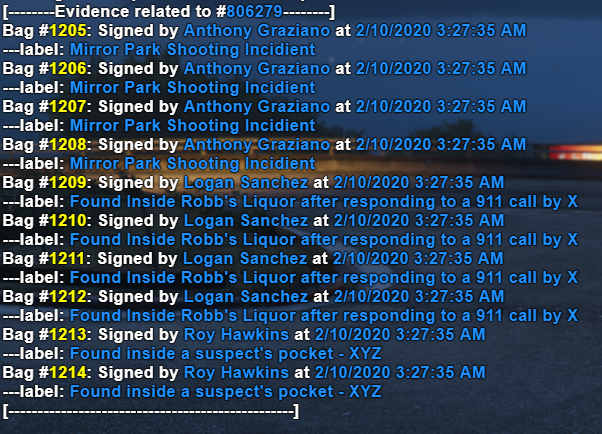
Feature Showcase: Forensic Firearm Investigation Introduction Forensic Firearm Investigation is a new system that aims to give a fresh and realistic look at Firearms. The key objectives are to give immersion to various Crime Scenes and boost detective/investigative type of roleplay. New additions that this update include are Spent Cartridges/Shell Casings and an Investigation Lab. Shell Casings / Spent Cartridges Upon firing a weapon you will now notice that a spent cartridge is left behind. If you are near one (or more) you can press Y which brings up an interaction menu that lists you the closest shell casings to your position. Upon choosing one from the list you are greeted with a couple of options. You can choose to either examine (1) it or pick it up (2). Examining a Shell Casing (1) If you choose to examine a Shell Casing, a message sent to you revealing some details regarding this specific Spent Cartridge. There are two pieces of information which would be of interest to you. Those are the Temperature and the Condition of the casing. The temperature value starts from around 370°C (~700°F) and drop down to environment temperature (which you get via /weather) at a decreasing rate. The whole process takes around 5 minutes which gives you a nice window to time events and so forth. On the other hand, there are four (4) different levels of condition. A shell casing can be Trashed, Severely damaged, Good or Excellent which is internally randomized whenever a round is fired thus a casing is dropped onto the ground and plays a huge role in the examination part of the system which is covered later down below. Picking one up (2) Dropped Shell Casings have a "lifetime" of two hours, they get automatically deleted if no-one picks them up within that window and are not stored in the database. They can be picked up anyone and is suggested that you do if you wish to avoid the Law's attention. Trying to use one (via /useitem) will display the condition, the cartridge type but not the temperature. Trying to use one as a LEO gives you an extra field called Label in which you can populate with some text and as you can see, it is now considered an Evidence Bag. It is expected that you roleplay picking and bagging them up when you do so. The Lab The Forensic Laboratory is a facility where Shell Casings are brought to for Analysis. By entering the premises and pressing Y, once again you are greeted with an interaction menu. Preliminary Examination Most notable at this point is the "Turn In Shell Casings" option. Upon selection, it runs a process that goes through your inventory items and extracts all the shell casings out of it. The Lab Personnel would then proceed and run a preliminary examination for each of the casings that you've just brought in that determines whether or not an Evidence Bag will be kept for further examination and long term storage. For a Shell Casing to be stored and be further examined, it needs to have a satisfactory condition and the cartridge must have been fired from a non-police-issued firearm. The second constraint is straight forward but as for the condition it goes as following: If a Shell Casing's condition is label as Trashed then it instantly gets discarded. If it is labeled as Severely damaged then there is around 75% chance to be discarded. If it is labeled either Good or Excellent then it is kept for further examination and long term storage. The Evidence Bags that are kept, they are assigned an ID and can be previewed using the /casing command or using the Mobile Data Computer. MDC Shell Casings Evidence Bags The Command Explanation option displays you a short help text related to the /casing command, the command functions are also explained in detail within this thread further down below. The Help Page option directs you to this page. Further Examination After a Shell Casing (effectively an Evidence Bag by now) finally goes through the submitting process the Lab immediately starts examining the Spent Cartridge for unique striations and markings. This process effectively takes ~40 minutes for a Shell Casing to complete. Keep in mind that the quality of the casing influences both the time needed to yield results and the amount of Evidence Bags/Casings needed in order to get a positive match. After the examination the Evidence Bag becomes available for checking/matching against seized weapons or Serial IDs. Effectively it comes down to a routine where everyone collects evidence, labels them and passes them onto the Lab for processing. Then when a weapon is seized from a suspect that in turn gets passed onto the Lab to match against all the processed casings and see if there's any matches. Here are two examples, one of a positive match and the opposite. If there are more than 10 casings relating to a specific firearm then you are prompted with expand option. The expand option would list the evidence bags like this Command For simplicity, all "commands" related to this system all fall under one command in a form of a tree. You can see the various "sub-options" and their corresponding actions below. Extra An additional /examinecasings command has been added to address the issue where there are multiple interactable dropped objects around you along with the casings while pressing the Y button to interact with them. The mentioned command works uniquely with the shell casings and brings up only the appropriate menu.


-
Congrats to everyone!
-
1. Breaking Bad Others: Prison Break (not season 5) / Game of Thrones (before they ran out of book material) / The Witcher / Fringe / Lost / Scrubs
-
-
Congrats to everyone!
-
Real Estate, landlord-ing about to graduate as a Software Engineer. Thinking on going for a Msc in A.I and Data Analytics soon.
-
Feature Showcase: Hair Tattoos Information Hair tattoos serve as an addition to add to the existing character customization options. Along with the standard hairstyles which are widely available, you now have the option to choose one or more of these hair decorations that stick under the hairstyle onto the scalp. There are different variations for each gender, the system accounts for that and gives you the proper options. . Usage The first option has a small description and displays how that specific decoration looks on the character. Whenever you decide that you want a specific hair tattoo you simply navigate to "Add" below and press Enter. That includes it into a "wanted list" and from that point on it will stick onto the scalp. You can go back up and repeat the process, you can add as many hair tattoos as you see fit in order to give your character a unique look. If you can keep track of which hair tattoo(s) you have added you can navigate to the corresponding description(s) and select "Remove". That would remove that specific one from the said "Wanted List", on the other hand you could select the "Clear" option and start over. In the end, all that's left to do is complete the purchase and from that point on it will stick to the chosen outfit(s).


-
Congratulations to everyone.